WEEK 2
Plotting and Mapping
In pairs, design and create a “plot party*” to research your peers’ preferences when it comes to working in collaborative environments. Come up with an evocative statement or question that you can invite your classmates to respond to, based on this week’s readings. The plot party should give us insight into the collaborative patterns and preferences within the group. We will all respond to each other’s plot party’s before the next show and tell. Suggested tools: laser cutter and vinyl cutter (can also be used as drawing machine).
*This format has many names and often remains unnamed. At the Visual Methodologies Collective, we call this format of eliciting responses a “plot party”. It is an engaging manner of gathering information and personal views from various people and also acts as collaborative visual intervention that can be used to elicit responses about certain issues, to formulate (better) research questions, gather opinions and start a discussion, or identify priorities around a specific topic. Plot parties hold a playful and informal middle ground between a questionnaire, an infographic and a discussion starter. As such it can be an attractive exploration and research tool for events and gatherings. Check out the references below.
ASSIGNMENT
COLLABORATING
For this week's assignment I'm working with Neza Prapronik. I wanted to work with Neza because I think she can motivate me well. In the first week of the Minor, Neza started her assignment almost immediately and I tend to postpone my assignments. In addition, Neza and I do share the same vision to create something that we can both be proud of. I'm a perfectionist so I think it's important that my work looks neat and tidy. That's why I think this can be a good collaboration.
Directly after class we made plans for the next day. We agreed to look for a few inspiring pictures, to help in what direction we want to work.
1. Source
3. Source
2. Source
I
N
S
P
I
R
A
T
I
O
N
Exchange Ideas
I have chosen these images for several reasons. They serve as inspiration and as a guideline for this week's assignment.
-
-
-
-
The next day Neza and I shared our inspiration and ideas. But first we needed a good question to work with ... We both came up with a few options that we could use. Neza noted these options in her notebook. We wanted to create a question that answers more questions.
Why these images?
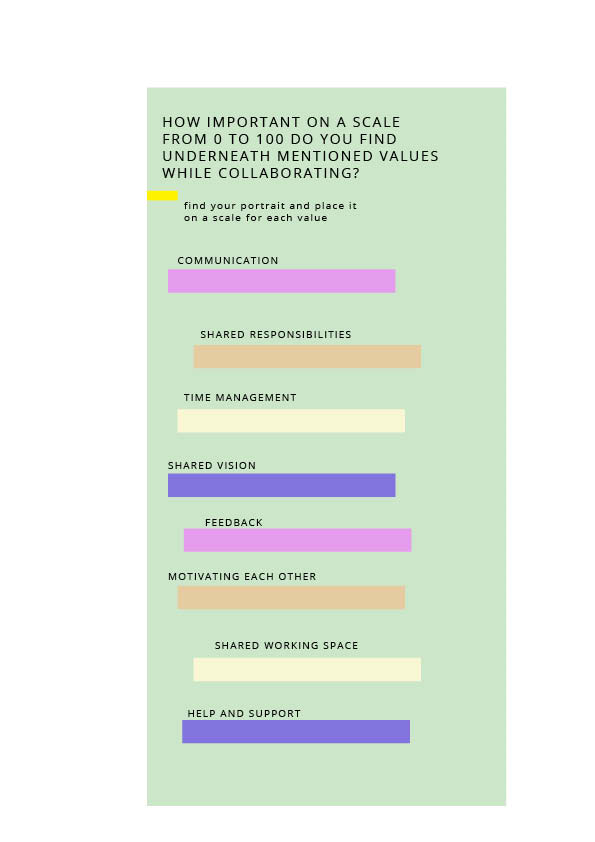
How important on a scale from 0 to 100 do you find underneath metioned values while collaborating?
Values:
-Shared responsibilities
-Time Management
-Shared Vison
-Help and Support
-Shared Working Space
-Feedback
-Communication
-Motivating each other
In the end, we chose this question:
The concept
After we had chosen the question, we could finally start with the real concept. I got a call from Katharina asking if I needed anything from the Gamma because she was going there anyway. I asked her to bring an MDF sheet with a thickness of 4 mm.
At that time we hadn't finished the concept yet, but the MDF sheet wasn't that expensive, so I told Katharina to buy it anyway.
When Katharina arrived, we were actually very happy with the size of the MDF sheet, so we decided to work with those dimensions.
Neza and I went to the storage room to see what we could use for our Plot Party. All we found was a mint green spray bottle, but it was almost empty. The color really appealed to us and for that reason we wanted to use the paint for the sheet.
We didn't know if we were going to be able to paint the whole sheet because the spray paint was already almost empty.
After a few minutes the paint was empty. We came halfway, so we had to come up with another solution. We decided to cover up the rest of the MDF sheet with paper. Mint green is a pastel color, so we wanted to continue with these color tones. We found a light grey sheet under the laser cutting machine that matched the mint green colour very well.
5. Mock up from the Plot Party.
Image: Neza Prapronik in Indesign
Testing the Plotter!
For this week's assignment I would like to test the Plotter once. I like to make stickers myself. So I wanted to do the task of making the text.
At first I wanted to use the laser cutter. But there are several reasons why I didn't want to use the laser cutter. If you cut the text out of the plate you lose the inside of the letters. It is very difficult to place the sheet as precisely as possible in the laser machine. If I would get the text engraved, there is a chance of burn marks and this can be sanded down, but not on MDF because there is a layer of lacquer on top of it. A last option would be to cut out the letters from another sheet. But then you have to be able to position the letters perfectly when sticking them on.
With the vinyl stickers you don't have these problems. You keep the inside of the letters and the spaces between the letters remain the same. At first we wanted to use black vinyl, but that was out of stock, so we used gray vinyl.
The first time I used the plotter it went very well, I wasn't sure if the question was well put together. We asked Asle what he thought of the question. He told us that he didn't like the order of the words. So Neza, I and Asle re-arranged the question to: "When collaborating, how important do you find the underneath mentioned values on a scale from 1 to 100?"
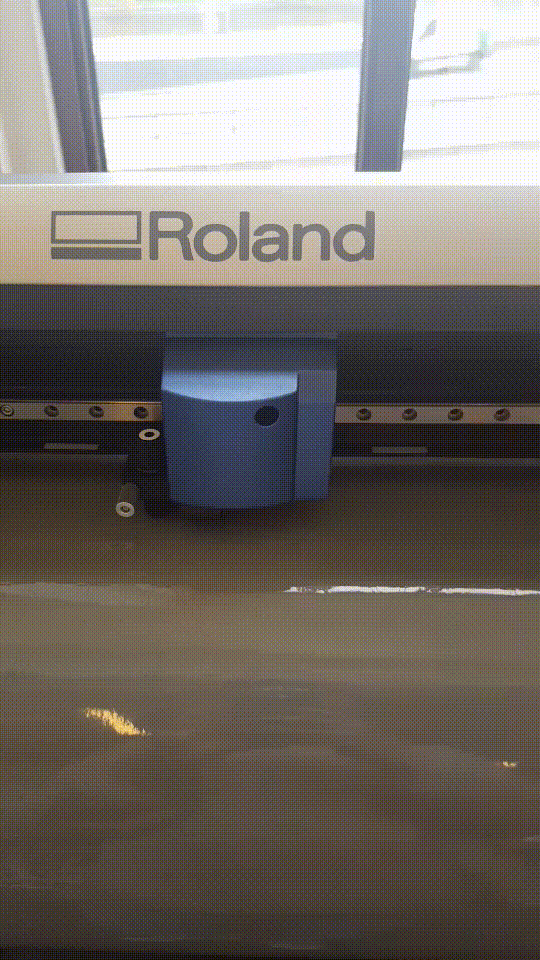
6. Testing the Plotter, Roland
Grey Vinyl
GIF: Melissa de Bie
Image: Melissa de Bie
Are we going to make it?
3. Mint green spray paint
1. Scan of Neza her Notebook.
4. MDF sheet with the gray paper
Image: Neza Prapronik
Image: Neza Prapronik
Image: Neza Prapronik
Image: Neza Prapronik
2. Scan of Neza her Notebook.
THE FINAL RESULT
BEFORE
AFTER
HOME
In all the images, the colour combinations really appeal to me.
In image 1 I find the font very clear and very readable.
In image 2 I like the pop up effect of the bars. It gives a little extra to the design.
In image 3 I like the way the papers are organized. It looks clean and tidy.
7. Removing the unnecessary vinyl pieces
After we decided to change the question. I had to cut the question again with the Plotter. Unfortunately the second attempt went less smoothly than the first one.
When the vinyl is rolled up too tightly, it causes bumps in the material. These bumps are a problem because the knife of the plotter ruins the material while cutting. It's only a matter of waiting how the text comes out.
I had to re-cut the words that weren't cut properly. This became a problem when the material started to run out.
In the end, I had all these loose words that I had to put togheter
This took a lot of time and effort, because I had to position the words carefully one by one.
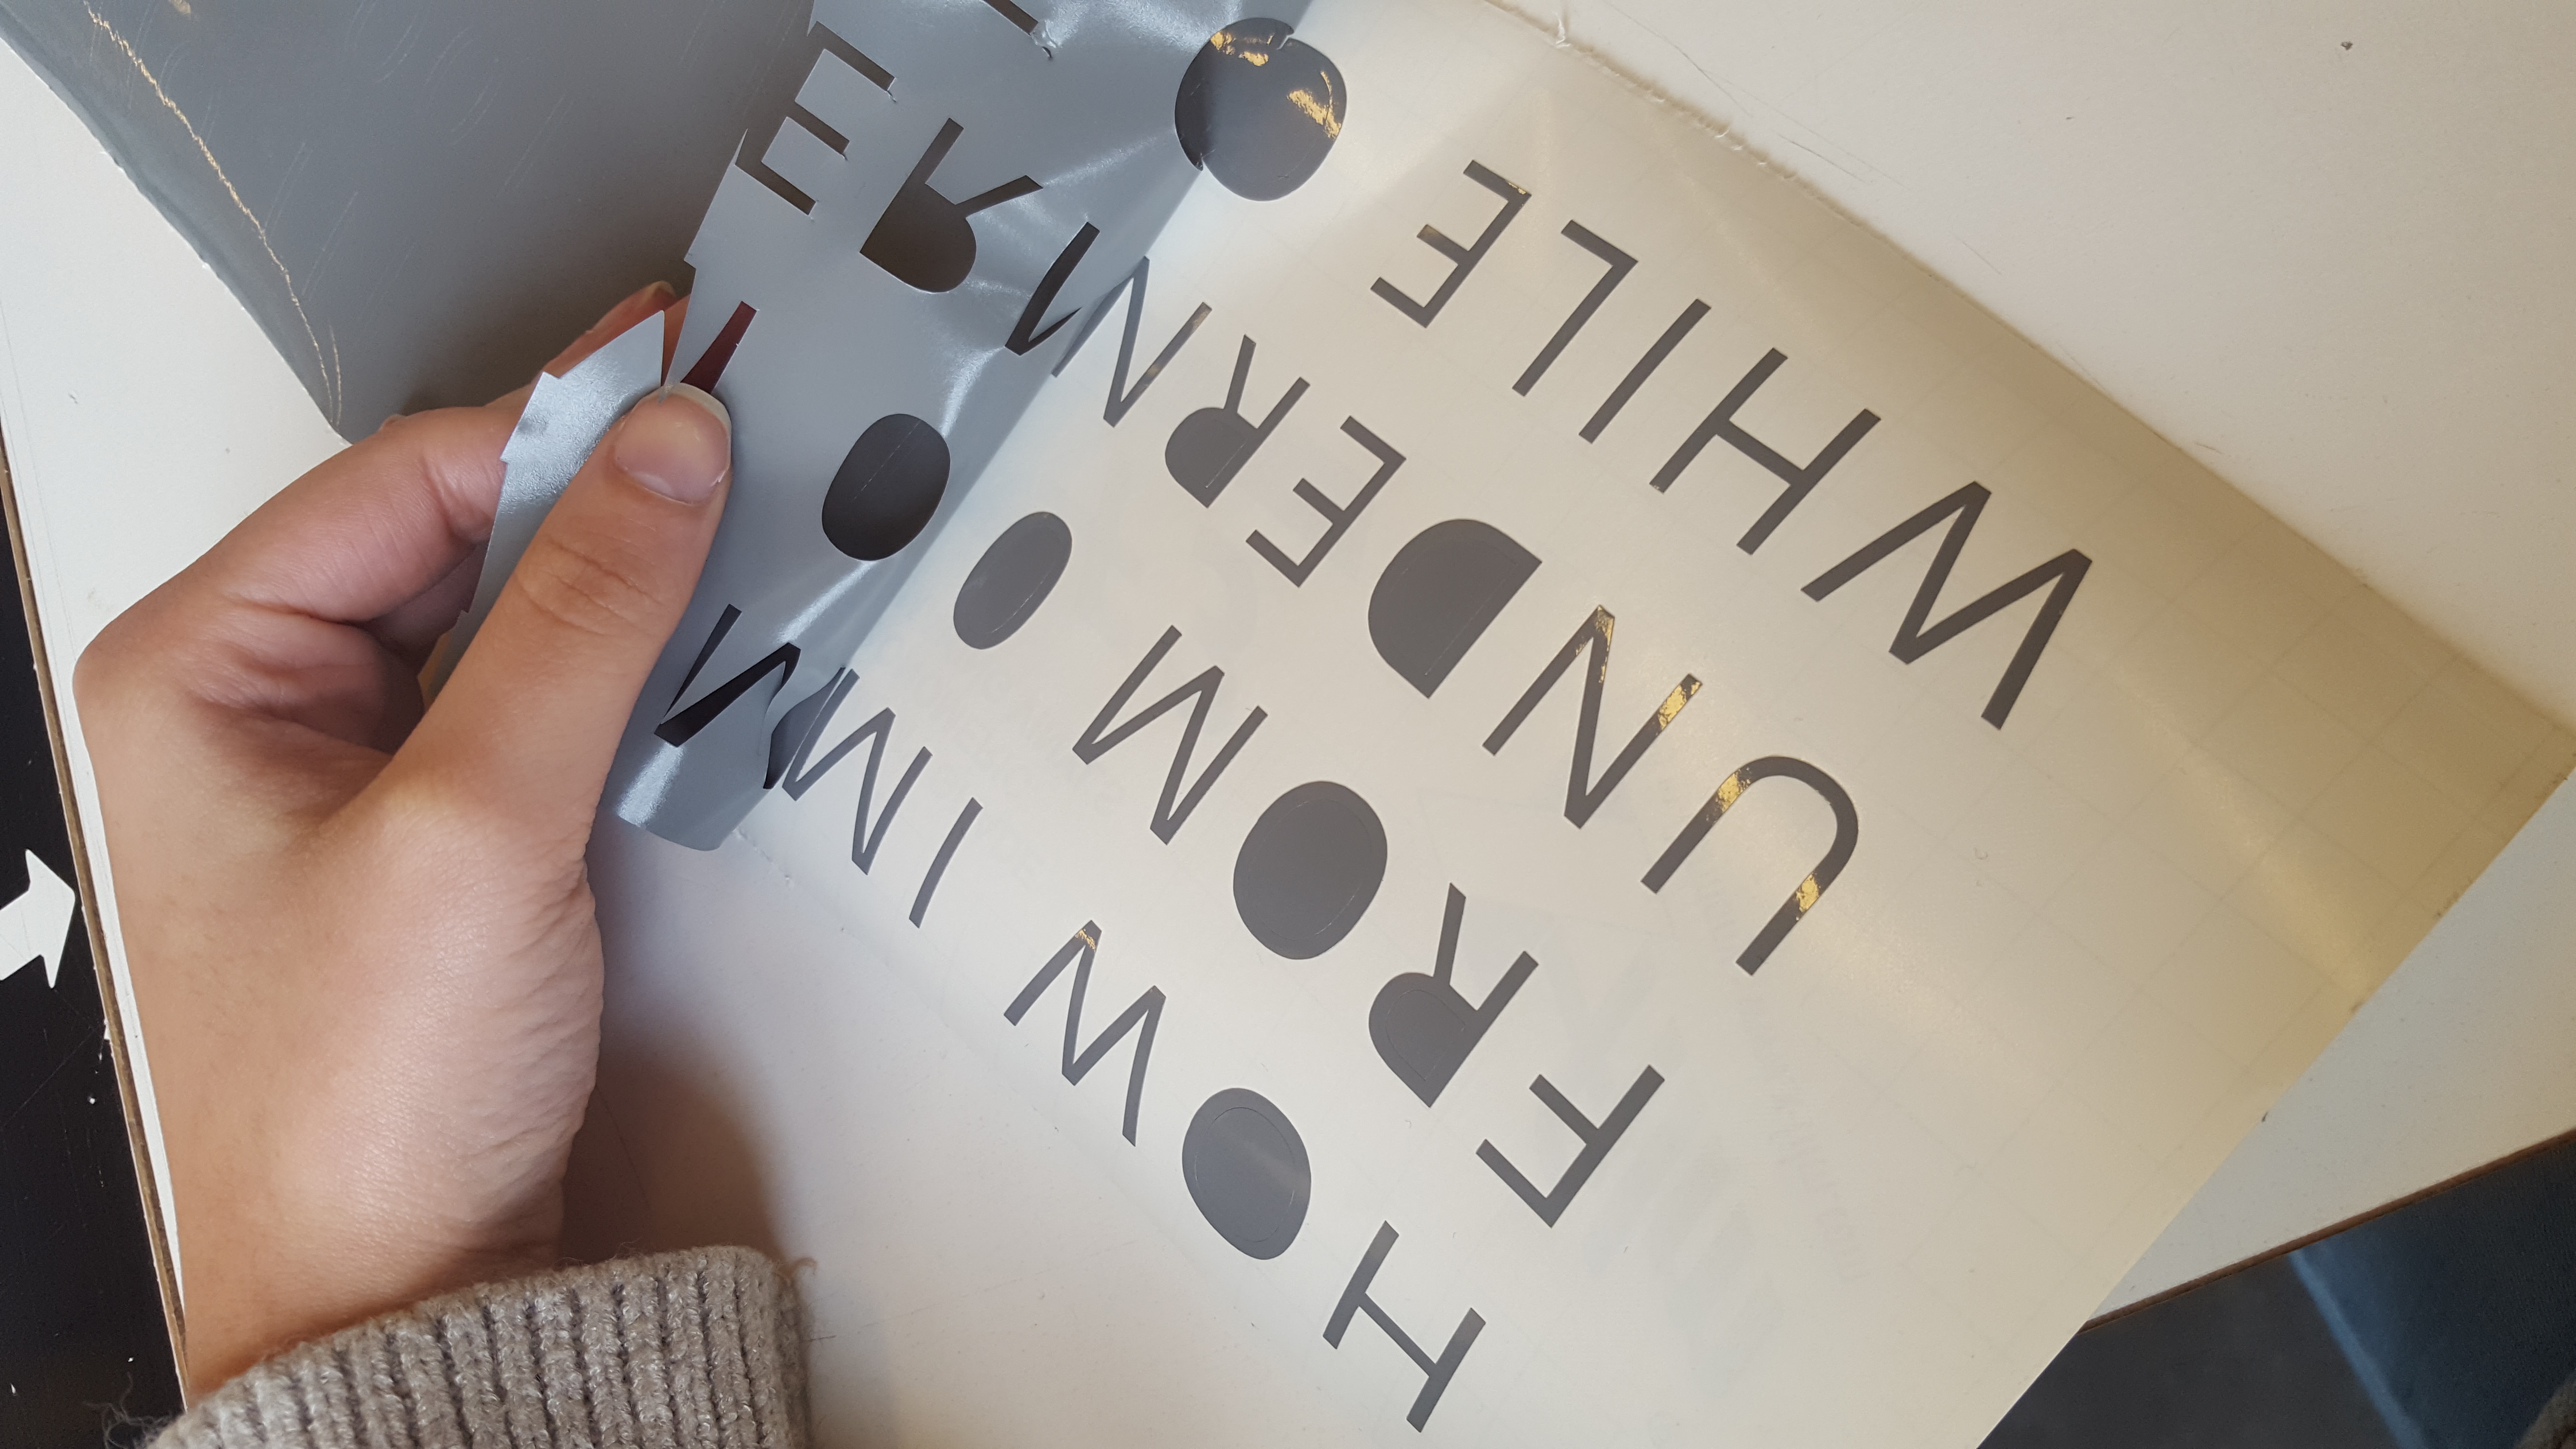
I was able to transfer the words on the MDF sheet by using transfer paper. This didn't go well because the words didn't stick. By scratching the letters with my nails and subtracting the transfer paper as close to the sheet as possible, I finally managed to get the words to stick.
What struck me was that when I cut off a piece of vinyl that contained bumps, the next piece of vinyl suddenly also got bumps after I had placed it in the Plotter. To avoid this I decided to leave the piece of vinyl with the bumps and pull it through the Plotter until I came across a smooth piece. This turned out to be really helpful.
Positioning the words
8. Placing the words on the MDF sheet with transfer paper.
For some letters I used special tweezers to remove unnecessary pieces of vinyl without damaging the letters. This was necessary for the gelsoten letters.
9. Positioning the words.
Image: Melissa de Bie
Image: Melissa de Bie
Neza's part
While I was positioning the text, Neza-san was making the beams. We decided to fill the beams with styrofoam. Styrofoam is very light, and it's easy to stick thumbtacks in it.
Neza cut the pieces Styrofoam by hand.
The paper templates are cut with the laser cutter. Folding the templates didn't go as smoothly as she expected, so I told her it's better to dot the lines. This makes it much easier to fold the paper. In the beginning she wasn't happy that she had to laser cut everything for the second time, but in the end this gave a much better result.
Maybe dotting isn't so bad after all...
Helping Neza to finish the beams.
I helped Neza with packing the styrofoam in paper.
We used a glue stick to glue the paper.
10. Cutting the Styrofoam.
11. Attempt 1 to pack the Styrofoam.
Image: Neza Prapronik
Image: Neza Prapronik
12. Laser-cut template with dotted lines.
Image: Melissa de Bie
13. All the beams packed in paper.
14. The beams are finally finished.
Image: Melissa de Bie
Image: Melissa de Bie
Pasting the beams on the board
After I applied the text, the bars could be glued on.
Finally the board started to look like something.
I didn't like the overflow from the mint green to the grey paper. So I used black insulation tape to cover it up. The black tape separates the question from the values.
From portraits to nameplates
Neza was in charge of the portraits. In the first instance, we wanted to use the portraits. But on a small scale, the portraits were difficult to laser cut, so we decided to switch to nameplates.
Everyone had their own color. We deliberately did not choose pastel colours so that the colours do not disappear into the background. By using thumbtacks it is possible to pin your own name on the board.
15. Pasting the beams on the board
16. The board in one piece.
Image: Melissa de Bie
Image: Melissa de Bie
17. The nameplates
18. One of the portraits
19. Neza organizing the nameplates
Image: Neza Prapronik
Image: Melissa de Bie
Image: Melissa de Bie
Image: Melissa de Bie
MAKER SKILLS & ATTITUDE
COLLABORATIVE LEARNING
Working with Neza went very well. Neza is someone who gets down to work right away and does what she has to do.
I sometimes have a tendency to postpone things, but she motivated me to work harder.
Before we went home, we agreed on what we wanted to do the next day and kept to the plan.
As a result, we were ready just in time and we got a nice result at the end. Neza is someone who comes up with a lot of ideas, which sometimes made it difficult for me to recommend my own ideas.
Because of last week's assignment, I've learned how to work with the Plotter. The first time working with the Plotter went very well, but the second time I was less lucky. There were bubbles in the vinyl during the cutting process and this causes the cutting to go completely wrong.
I thought I'd be smart by cutting off the piece with the wrinkles. But after I put the good piece back in the Plotter I had wrinkles again.
This gave me the plan to leave the piece with the wrinkles on. And pull the vinyl through the Plotter until I had a good piece. This did help!
Placing the text on the MDF board was quite difficult. After a while I got the hang of it, but first I had to press on all the pieces of text by scratching them with my nails. Otherwise the stickers wouldn't stay on properly.
For our ''Plot Party'' we wanted to make beams out of paper with polystyrene in it. Neza didn't manage to fold the paper. So I gave her the tip to dot the folding lines. This saved a lot of work and time!
MINOR MAKERSLAB 2019